Getting Ready
Completion Time: About 2 hours
Budget: $100 – $150
Materials needed:
- Fire ring
- Fire pit-ready paver stones
- Fire pit-ready paver bricks, sand or gravel for the base
- Construction adhesive (optional)

STEP 1
Gather your materials. You can use any kiln-fired paver stone. The one shown here is quite popular and works well with the typical fire ring. You can use a chisel and hammer to knock off the lip. Then place the stone upside down to hide the scar caused by removing the lip.

STEP 2
Pick a spot that is safely away from buildings and the canopy of trees. Check your local ordinances. There may be regulations that dictate the minimum distance the fire pit must be placed from your house, outbuildings and your property line.

STEP 3
Place your fire ring in the spot where the fire pit will be located. Place one row of stones around it and use a spade to mark the outside edge of the fire pit. Your mark should form a complete circle.

STEP 4
Excavate inside the circle 2-3 inches deep. If you are using pavers for your base, excavate to a depth equal to the height of the paver. When placed, the top of your pavers should be fairly flush with the ground.

STEP 5
Do a rough leveling of the dirt inside the circle.

STEP 6
Tamp the dirt. If you don’t have a tamp, any heavy object with a large flat surface will work.

STEP 7
Do a final level using a trowel. This is where you want to be precise. If you are using gravel or sand for your base, skip this for now.

STEP 8
Place your base material. If you are using pavers, fill in gaps along the edge with gravel or sand (as indicated by arrows). This will help keep the pavers in place.

If you are using gravel or sand, fill the circle with your base material and level only the area where your main stones will be placed (as indicated by the red ring). You don’t need to level the rest of the base material.

STEP 9
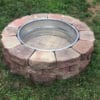
Place the fire ring in the center of the circle.

STEP 10
Add your layers of stones.

STEP 11
Use an alternating placement pattern for success rows. Each stone should be centered at the point where the two stones below it meet.

STEP 12
You may find that you have a gap.

If so, you will have to custom cut one stone on each row.

STEP 13
Place the rest of your stones. You may want to use adhesive to keep them in place. If you want the option to disassemble your fire pit and move it, don’t use the adhesive.